Search This Blog

Wednesday 30 August 2023

Update - August 2023

I haven't posted much lately, but that is because things are not finished and ready to post.  I have actually been making pretty good progress.

The cowl has been a lot more work then I planned on, but it is getting close.  More sanding and filling, and then I can start priming it.  I have all the fasteners and have been playing with them on some scrap fiberglass.

The engine plenum is ready for fasteners - but i am waiting to figure out the intercooler plumbing from the front of the cowl to the back.

Waiting on exhaust parts.  I bought some amazon 304 stainless, and did not like the look of it so I am getting bends from the factory in Europe.  Hopefully I will have pricing and shipping details soon.

The intercooler is completely mounted, and the intercooler plenum is build, finished and riveted.

I bought an air fuel ratio monitor.  Need to weld in the bung, which i am going to do when welding the exhaust.

All the firewall forward fuel lines are done.

Played around with wrap on the control surfaces.  Pretty sure I am going to paint.

Oil cooler is done, except I need to make 1 new bracket.  All the oil lines are done and the oil filter adapter is mounted.

The oil filler door is on, but needs some tweaking.

The glareshield is almost ready for upholstery.

I have the crimper for the plug leads, but havent started that yet.

1 window is in, and in the process of fitting 2 more of 7 total.

So lots of progress, and lots to go.  BUT ITS PROGRESS!

Tuesday 29 August 2023

Windows - Part I

Well, I am finally thinking about windows.

Part 1 in Zach's video series is located here.  I watched these years ago - just finished watching them again, and figured I would take notes.  Where Zach jumps ahead or goes backwards, I have updated the sequence to be linear.


Materials Needed

  • ~12 wet erase markers
  • Fresh razor blades
  • Home depot style paint stir sticks
  • ~20 3/32 wing nut clecos
  • 2" 3M 2090 tape
  • 1/4" masking tape (not fine line tape)
  • Silpruf - check expiry date
  • Permatex RTV silicone gasket making material - Ultra Grey
Steps - this is a culmination of all the videos.

  1. 3 to 4 days in advance, lay down some lines silpruf on a scrap piece of aluminum.  These will be used to create standoffs for the plexiglass against the joggle.
  2. Pull back ~2" of the film on the window all around the edge, both top and bottom.
  3. Lay the window into the joggle and mark where it needs to be trimmed to fit inside the joggle.  Trim window to expose enough of the joggle so a line 3/16 from the joggle can be made on the window using a wet erase marker
  4. Sand joggle and return.  Fix any defects in primer or gel coat
  5. Mark the 3/16 line from the joggle on the window
  6. Trim up to the line - but not past the line.  Will probably take 2 passes.
  7. Check fit of window
  8. Drill #40 holes for wing nut clecos and install.  Use pieces of Home Depot stir stick with 3/32 hole to act as bridges between the window and fuselage.
  9. Mark INSIDE of window at joggle - this will be used to tape the inside of the window
  10. Mark the joggle on the OUTSIDE of the window.  This will be used to tape the airframe and stop silpruf contaminating the surface to be painted
  11. Tape the INSIDE of window in 3 steps
    1. Blue 1" 3M 2090 tape ~3/16 from pen line
    2. 1/4" masking tape up to but not covering the tape line.  Mark as tape #2
    3. Remove black line using moist paper towel
    4. Use another piece of 1/4" masking tape to overlap tape #2 by ~1/16".  The purpose of this tape is to remove the initial silpruf layer to get a clean edge.  Mark as tape #1
  12. Sand outside edge of window to either 100 or 120 grit, more if desired using a sanding block
    1. Ensure you get any nicks out of the edge
  13. Sand by hand with a piece of 120 grit paper in your hand to put a soft 1/16" edge on the edge of the window
  14. Tape the OUTSIDE of the window
    1. 2" tape around the outside of the window, overlapping the window slightly
    2. Using a razor blade on an angle, cut the excess of the tape off.
  15. Sand the inside of the window that is not taped with 80 grit using your finger as a guide, but do not sand the tape
  16. Wipe the inside of the window with a fresh dry paper towel to remove any dust
  17. Add a bead of silpruf to create a boundary layer on the exposed window edge.  Smooth with your finger.  Start with a small amount and add if needed.  Create an opaque layer that you cannot see through
    1. Only put the boundary layer on if you are going to install the window within 12 to 24 hours
  18. Remove tape #1 from the inside of the window before the silpruf dries
  19. Set aside and let cure 12 to 24 hours
  20. Taping the airplane - paint later option
    1. Using the blue 3M 2" tape, tape the outside of the joggle up to the line inside of the joggle.  Use small pieces around the corners.  Press the tape into the corner of the joggle using the cap of the pen.
    2. Mark the tape on the outside of the joggle indicating where the holes for the clecos are located.
  21. Standoff placement
    1. Using the Permatex ultra grey silicon, bond in the standoffs wherever needed - but at least at every cleco.  Put the standoff at the inside of the hole
  22. Back tape the inside of the fuselage and trim with a razor blade
    1. Cut flush with side of joggle
  23. Once dry (from step 19), take a razor blade and scrape the edge of the window to remove any dried silpruf.  Do not roll it off with your finger as it may come off the bottom cosmetic layer of the silpruf
  24. Trim the dried standoffs in a trial and error manor to get the window to sit flush with the joggle.  If in doubt, leave slightly proud as it will compress with the cleco
  25. Silprufing the window
    1. Check the tape on the inside of the window to ensure it has not rolled up.
    2. Redrill the cleco holes to puncture the tape on the inside of the fuselage
    3. Clean the inside of the joggle and window with a dry paper towel
    4. Dab silpruf along the tape line in the inside of the window.  Rub it in between the cured silpruf and the tape with your finger.
    5. Fill the joggle up with silpruf.  Overglue rather than underglue.  
    6. Depending on the height of the standoff, vary this bead thickness - between 1/8 and 3/16
    7. Working time is ~45 minutes
    8. Lay the window in place 
    9. Push the window down where the cleco is going to go.  Clean the area around the cleco using a 1" piece of a spreader
    10. Insert the wing nut cleco and tighten until it does not move.  Do not overnighten.  The goal is to get the window flush with the joggle.
    11. Repeat steps 9 and 10 until complete
    12. Clean remaining silpruf in seam between window and joggle.  Drag from the outside to the inside pushing silpruf towards the window edge.
    13. Start pulling the tape carefully up to a cleco.  Remove and clean the cleco, and flip the wood bridge over and reinstall.  Repeat for all remaining clecos.
  26. Clean the inside of the fuselage
    1. Using a small piece of scraper, gently drag the silpruf between the edge of the window and the joggle.  The goal is to smooth it out
    2. The goal is to backfill the gap between the joggle and window with silpruf, and remove any large chunks of squeezeout.
    3. Pull tape #2
    4. Clean up cage tubes if required.
    5. Leave clecos in for minimum 2 days for all windows except front window.  4 days for front window
Starting on the pilots side roof window.

Rough cut to fit in joggle.


I am using my air powered orbital sander with a 6" disk.  Not quite as aggressive as what Zach uses in the video, but I am just fine with that.


Rough cut #2


After 3 trims, I am happy.  Proceeded to drill and cleco.


Inside tapped off with 1/4" masking tape marked.


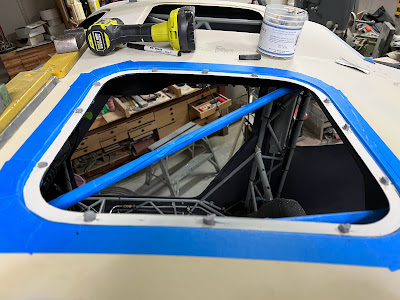
Both sides of window masked.  Inside and outside of fuselage masked.


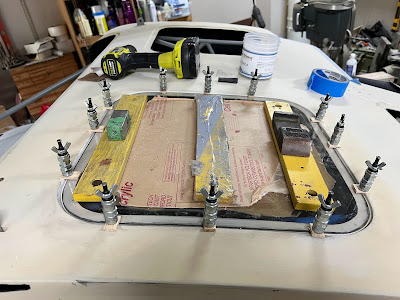
Standoffs glued with RTV.  Note - I also taped off the inside of the cage from the top.  Hopefully this is not a bad idea (in terms of removal down the line).  Per the instructions, I should have applied the cosmetic layer on the bottom of the window already... however I am tied up for a few days and wont have a chance to put the window in, so going slightly out of sequence.  Will get the standoffs cut, and then go back and do the cosmetic layer.

Everything fit and silpruf'ed in place.


I used way to many clecos.  At first I didnt put them in the corners, but had 3 along each side.  After going back and watching the videos again, I realized that the corners were the most important so I added them.

I pulled the tape back in a couple areas to see how the cosmetic layer looked - its OK.  I wish it was a bit crisper but I am fussy.  Only 6 more to go (sigh).

The above process worked quite well all in all, especially for a first attempt.  Hoping they get better from here.