Search This Blog

Showing posts with label Header Tank. Show all posts

Wednesday, 3 June 2026

Header tank, venting, flow, low fuel levels

The header tank - and more specifically the header tank level indication - have been giving me problems.

On the first flight, the header tank warning went off.  Landed quickly, and tore the entire system apart and made it better.  

4 hours of trouble free flying after that.

Then the low fuel header warning started going off again - but it always cleared, usually within 30 to 60 seconds.

I am not going to live with this, so investigation into why.

I know the fuel system can keep up with the demands of the engine.

Through a bunch of smart fellas on the forum and fellow UL builders, we have been scratching our heads.

The suggestion came up to look for something on the suction side that is tight enough to not leak, but not tight enough to not let air into the pump / injectors.  He also suggested del rings (available at spruce) that provide a better seal on AN fittings.  But then I found it.

On the input to the pumps, the clamps were not tight.  And the hose barb fittings on the other side of the hose had no clamps.

Before


After:


Time will tell if this solves the problem... but the current working theory is air was coming in through the return line into the header.  The air would build up, and it would take time for there to be enough pressure for the air to make its way up the vent and 'burp' the tank.  Then everything would be fine for awhile.

Header tanks are a real head scratcher in their design, specifically the vents (in high wing aircraft).  I think I am slowly ironing out the kinks.

Update:  This did not solve the problem, and now the problem is worse.  I started putting some pieces of the puzzle together a few days ago.

I started of running ethanol free 89 octane fuel, and used boostane to bring it up to 94 octane.  Around hour 5, I switched to ethanol 94 octane, which I can get locally (have to go to Blaine, WA for ethanol free).  The problems started (again) when I switched fuels.  I did not put these two things together until about hour 19.

So the problem started again after switching to ethanol fuel, and it has been getting worse the as the outside air temps have risen.

I started googling 'ethanol fuel', 'injection systems', and 'header tank'.


And then add this (below) from the UL installation manual.


What I make from all this.

  • I had 5 trouble free hours running non-ethanol fuel
  • My header tank design had a flaw, in that my return was on the top of the tank.
  • Ethanol fuel is more prone to frothing
  • I've been having more problems since the weather started warming.
I now have a tube / stand pipe for the return that is 5" below the top of the tank.


This should fix or at least help the frothing problem.  I may be dealing with vapour as well.

The vents are capable of clearing the air... it's been doing that for 14 hours of issues.

I have replaced a section of the vent line on the A pillar with translucent tubing.


The hope is I will be able to see bubbles.  I plan on having a camera face the vent tube to capture what is going on.

I am going to go back to ethanol free fuel.  I may start off with a 2/3'rds mix as I have to get rid of the ethanol 94.  1 part ethanol, 2 parts non ethanol.

Cameras on the panel and the vent tube.

Ground run first to shake out any issues.  If that is successful, will stay over the airport for at least an hour to shake it out more. 

So fast forward months... 

I've upgraded the vent line to a 6 mm ID all the way out to the wing tips.

I moved the header vent line to be AFTER the check valve (not before).

The problem is virtually gone... it will happen every once in awhile, and you need to drop a wing and go into uncoordinated flight for 30 seconds to get the bubbles moving from the header up to the tips.  Seems to happen about every 2 hours of flight.

I think I have a bit of a P trap in a climb... but it doesnt always happen in a climb.  So I dont know.  Its FAR FAR FAR better than it was.


Sunday, 5 April 2026

Fuel system changes, and second test flight.

It's been 9 days since the first flight.  Been working to understand the header tank issue so I can fix it.

First was to essentially redo the fuel flow test to understand if the vents are working properly and fuel / air can move where they need to move.

For the first flight the header tank venting system went like so:

  • From the header tank, two vent lines come out of the top and run horizontally towards each wing.
  • Make a 90 and head aft and go up the door frame.  From there they go along the top of the door to the wing hinge just forward of the aft spar.
  • Then they make 180 and go forward and are attached to the root rib.  They transition around the forward spar and then into a conduit along the leading edge of the wing.
  • They exit the leading edge at the tip and are T'ed into the vents from the main and aux tanks.  
  • Then into a Andair checkvalve, then to the JD airparts vent under the wing.
The problem with this... the big U from the door back to the leading edge could be a P trap.  I did it this way so you can still easily fold the wings.

So I changed all this.  The vent now exits the fuselage at the leading edge of the wing and goes straight down the leading edge.  It is now always uphill to the wingtip.  All of this was accomplished in a couple hours.

Then to test...

Ran many, many tests.  The summary of what I found.  
  1. The fuel flow with the original and new vent configuration is the same.  
  2. The right wing was transferring fuel averaging 30% slower than the left.
  3. I separated the vents at every point possible and redid the test.  Was always within a couple percent of each other.
The focus then became why is the right wing transfering fuel slower?  It wasnt the vent.
  • Folded the wings (again).  Took out the finger strainers.  Strainers were clean, but there was construction debris (what my friend Geoff calls 'sworf').  Cleaned.  Tested again, no change.
  • Focused on the areas between the wing root and fuel selector.  Drained the lines, took every fitting apart and checked.  Found some shitty pipe ends that needed some filing.  
  • Removed the fuel valve.  Tested from the wing to the input of the fuel valve.  Both sides where identical.
  • Did a flow test on the fuel selector.  Same on both sides.
  • The lines from the wing to the fuel selector are 3/8".  The output of the fuel selector to the header tank was also 3/8".  No bueno.  I had the right fittings to change that to 1/2".  Header tank removed.  Drilled and retapped the tank (luckily the boss was HUGE).  New 1/2" fitting on the header tank.
  • Reassembled EVERYTHING and tested.  Now the flow is within 5% of each other.  On BOTH the fuel flow is considerably faster.
I tried to find fittings for the header vent at the wing / fuselage intersection.  Everything I tried leaked.  Finally just put in a short hose coupler with some clamps.  No leak.

Slept... tested again in the morning.  Still good.  Put the rest of the interior back in, wingtips back on, cowlings on.  Time to fly.

So I repeated the first flight.  Overhead the airport.

On the first test flight the header tank warning went off 26 min into the flight running at 13 GPH, 1500 feet.  So i did that again, but for 45 minutes.  Rock solid.  For the next 15 minutes I played with different power settings from 5 GPH to 15 GPH.  Still solid.  Landed without incident.  Airplane and pilot reusable.  Success!


No crowds this time.  No fanfare.  Just me and the Sportsman.

I put 40 lbs of stuff in the back and tied it down.  Move the CofG aft a bit.

Takeoff was great.  Climbed very quickly.  Setup an orbit at 1500 ft.  No alarms... only green LED's.

So that was flight test #1 repeat.  No audio issues.  My landing still sucked :-).


Tuesday, 24 March 2026

Update!

Posting an update... the last few weeks have been a blur.

A very large (if not the largest) number of E-AB issues on first flight are fuel related.  Specifically modifications to the fuel system, which I have done with the addition of the header tank and vents.

A good friend and mentor is going to come along for the first flight.  He has done many first flights, mainly in RV's.  He has a wealth of experience, is a good friend, and a wonderful person.  He mentioned this stat... his concern (and mine) are the header tank vents.  Specifically how they are all tied together under each wing tip.

His recommendation was to get a couple shop vac's on 'blow' and hold them up against the vents to verify the header stays full.  Ran this by a couple of my fellow UL builders, and the recommendation was to use leaf blowers instead as they have higher wind speed.

So this took me down an interesting side road.  How fast do leaf blowers 'blow'?  Google said between 150 and 200 MPH.  OK, that would work.  Purchased an anemometer from Vevor that would do 101 MPH.

I have a plug in electric leaf blower that was my Dad's in the hangar.  Let's start there... 81 MPH.  Huh.. .that is not enough.  A neighbour had a Ryobi cordless one... let's try that.  Slightly better... 83 MPH.  Not going to work...

I thought I could print some nozzles that would increase the air speed.  Designed one and printed it... EPIC FAIL.  It actually slowed the air down.  Found one online for the Ryobi and it wouldnt fit... was a good 1/4" out.  There are a lot of different models of Ryobi leaf blowers apparently.

Next was to grab my Stihl cordless from the house.  100 MPH!  OK, now we are talking.  

Another friend had a Stihl gas powered.... well it put the anemometer into overload.

Couple ladders to rest them on and two willing victims to hold them...


The 2/3rds header tank alarm never went off.  Ran at 10 GPH for 10 minutes.  That should have run over 1.5 gallons through the 2.2 gallon header.

After the initial euphoria of a successful test wore off I got thinking...  what if the header is not full... will it refill?  So going to do another test with that configuration.

I've had an ongoing issue of fuel leaking out of the filter assembly.  I got it down to less than a weep, but there was still fuel on the fitting.  Changed out the copper gaskets on the suction collector, still leaked and now started coming out of the seam in the reusable input filter.  Finally just took the whole thing out, replaced every gasket, torqued and reinstalled.  That got it.

Then there was the brake leaks.  This has been ongoing... months ago it was leaking out the park brake valve.  Rebuilt it with a kit from matco and had it pressure tested... no leaks.  Reinstalled... was fine for weeks and weeks... then it started leaking.  I think it was coming from the shaft.  I am tired of cleaning up 5606.  Pulled out the valve and put in 2 union fittings.  While testing, found a leak on one of the hoses on the co-pilot side.  Removed, re-terminated, pressure tested, fixed.  Reinstalled.  No more leak.  Plus endless cleaning of 5606.

Tweaking cowl fasteners for fit and height.

Anti chaff tape on flaps.

Polishing continues.

Went down to WA state for a checkride with an experienced Glastar / Sportsman instructor.  This was needed for insurance purposes.  Done!  Great airplane to fly...  

Friends have been asking for ages 'are you excited'?  Honestly I was not... had work to do.  NOW I am getting excited!  Last hurdle to first flight is passed.

Putting the interior back in today, test the vents tomorrow (Wednesday).  Fix any last minute gotchas on Thursday, fly Friday (3/28) weather permitting.  As of Tuesday, it's looking awesome.


Monday, 9 March 2026

All the little details...

So many things to finish.  

Final inspection schedule for somewhere between March 3 and 5.

I havent posted much because I have been so busy...

Log books are done.  Engine, Prop, Airframe and Journey logs.  POH is written.  Checklists are written. Maintenance manual is written.

Fuel flow test report is done and written.

TC's application for special cert of airworthiness.  Done.  All 3 copies.

Header tank has been removed, new bungs added, refinished, and reinstalled.

New level sensors for header tank obtained and installed.  New monitor board, indicators, and software complete.

Interior placards done.  Exterior placards waiting on polishing to be finished.

Paint touch ups done.

Tanks calibrated.

Fuel system leak found and dealt with.

Park brake valve leak found and dealt with.

Dealing with slightly sticky fuel tank sensors in main and auxes.  Checked against SB, does not apply.  Removed one sensor and checked.

Complete inspection on all control systems complete.

Deflection of all control surfaces verified.

Electrical system diagrams complete and printed.

All required paperwork done.

Went through checklist multiple times.

All exterior placards installed.


Header Tank... changes

I foolishly used two Beelite ultrasonic level sensors on my header tank.  When I started running the engine - or more specifically the fuel pumps - the top sensor would alarm due to the return line being too close to the sensor.  This is my fault.

When the lower sensor failed, it was time to change them out.

I used two Madison sensors (which ironically is the same as beelite is now using in their 'new' sensor).

My panel was made to fit the old Beelite sensor, but I am NOT buying anything from them again.  So I am going to create my own unit for displaying the fuel level.

Employing a Arduino Nano Every board.  I've done some basic Arduino programming before, but not for 15 years.  Figured I would give ChatGPT a try.  OMG... WOW.  I did not expect that level of detail... now to see if the code it spit out works.

Removed the tank... had 3 new bungs welded in.  The first two are for the two new Madison magnetic sensors (sourced from Amazon... $27 each).  And since I was at it, move the return line from the center of the tank to the forward corner.

WOW.  One day and its up and running / burning in.  Going to let it run on the bench for a couple days and see if there are any problems.  ChatGPT sure made this simpler.

As soon as I told it this was going in an aircraft it hardened the code and added a bunch more watchdog timers.  I already had some of this included, but it added more.  There was some minor glitches in the code, and I explained what it was doing or not doing, it fixed it.  Unreal.

Code below:
/*
  Aircraft Header Tank Advisory Indicator
  Arduino Nano Every (ATmega4809)
  Industrial / Aviation Version
*/

#include <avr/io.h>
#include <avr/wdt.h>

// ================= PIN DEFINITIONS =================
const uint8_t level1Pin = 2;
const uint8_t level2Pin = 3;

const uint8_t green1Pin = 5;
const uint8_t red1Pin   = 6;

const uint8_t green2Pin = 9;
const uint8_t red2Pin   = 10;

// ================= TIMING =================
const unsigned long debounceTime      = 3000;
const unsigned long redFlashInterval  = 250;
const unsigned long heartbeatInterval = 10000;
const unsigned long heartbeatPulse    = 100;
const unsigned long startupDuration   = 1000;

// ================= STATE =================
bool level1State = false;
bool level2State = false;

bool lastReading1 = false;
bool lastReading2 = false;

unsigned long lastDebounce1 = 0;
unsigned long lastDebounce2 = 0;

unsigned long lastRedFlash = 0;
bool redFlashState = false;

unsigned long lastHeartbeat = 0;
bool heartbeatActive = false;
unsigned long heartbeatStart = 0;

unsigned long startupStart;
bool startupActive = true;

// ===================================================
// WATCHDOG
// ===================================================
void enableWatchdog()
{
  RSTCTRL.RSTFR = RSTCTRL_WDRF_bm;
  CCP = CCP_IOREG_gc;
  WDT.CTRLA = WDT_PERIOD_8KCLK_gc;   // ~8 seconds
}

void resetWatchdog()
{
  __asm__ __volatile__("wdr");
}

// ===================================================

void setup()
{
  // Safe startup state
  digitalWrite(green1Pin, LOW);
  digitalWrite(red1Pin, LOW);
  digitalWrite(green2Pin, LOW);
  digitalWrite(red2Pin, LOW);

  pinMode(green1Pin, OUTPUT);
  pinMode(red1Pin, OUTPUT);
  pinMode(green2Pin, OUTPUT);
  pinMode(red2Pin, OUTPUT);

  pinMode(level1Pin, INPUT_PULLUP);
  pinMode(level2Pin, INPUT_PULLUP);

  Serial.begin(115200);
  delay(200);

  logResetCause();

  startupStart = millis();
  enableWatchdog();
}

// ===================================================

void loop()
{
  unsigned long now = millis();

  if (startupActive)
  {
    handleStartup(now);
    resetWatchdog();
    return;
  }

  handleDebounce(level1Pin, level1State, lastReading1, lastDebounce1, 1);
  handleDebounce(level2Pin, level2State, lastReading2, lastDebounce2, 2);

  handleRedFlash(now);
  handleHeartbeat(now);

  updateOutputs();

  resetWatchdog();
}

// ===================================================

void handleDebounce(uint8_t pin, bool &state,
                    bool &lastReading,
                    unsigned long &lastDebounce,
                    uint8_t channel)
{
  bool reading = (digitalRead(pin) == LOW);

  if (reading != lastReading)
    lastDebounce = millis();

  if ((millis() - lastDebounce) >= debounceTime)
  {
    if (state != reading)
    {
      state = reading;

      Serial.print("Level ");
      Serial.print(channel);
      Serial.print(": ");
      Serial.println(state ? "FLUID PRESENT" : "NO FLUID");
    }
  }

  lastReading = reading;
}

// ===================================================

void handleRedFlash(unsigned long now)
{
  if (now - lastRedFlash >= redFlashInterval)
  {
    lastRedFlash = now;
    redFlashState = !redFlashState;
  }
}

// ===================================================

void handleHeartbeat(unsigned long now)
{
  if (now - lastHeartbeat >= heartbeatInterval)
  {
    heartbeatActive = true;
    heartbeatStart = now;
    lastHeartbeat = now;
    Serial.println("Heartbeat OK");
  }

  if (heartbeatActive &&
      (now - heartbeatStart > heartbeatPulse))
  {
    heartbeatActive = false;
  }
}

// ===================================================
// *** FIXED OUTPUT LOGIC ***
void updateOutputs()
{
  // LEVEL 1
  bool green1 = level1State;
  bool red1   = (!level1State) ? redFlashState : LOW;

  // LEVEL 2
  bool green2 = level2State;
  bool red2   = (!level2State) ? redFlashState : LOW;

  // Heartbeat overlays green LEDs
  if (heartbeatActive)
  {
    green1 = !green1;
    green2 = !green2;
  }

  digitalWrite(green1Pin, green1);
  digitalWrite(red1Pin, red1);

  digitalWrite(green2Pin, green2);
  digitalWrite(red2Pin, red2);
}

// ===================================================

void handleStartup(unsigned long now)
{
  if (now - startupStart >= startupDuration)
  {
    startupActive = false;
    Serial.println("Startup Complete");
    return;
  }

  if ((now / 250) % 2 == 0)
  {
    digitalWrite(green1Pin, HIGH);
    digitalWrite(green2Pin, HIGH);
    digitalWrite(red1Pin, LOW);
    digitalWrite(red2Pin, LOW);
  }
  else
  {
    digitalWrite(green1Pin, LOW);
    digitalWrite(green2Pin, LOW);
    digitalWrite(red1Pin, HIGH);
    digitalWrite(red2Pin, HIGH);
  }
}

// ===================================================

void logResetCause()
{
  uint8_t flags = RSTCTRL.RSTFR;

  Serial.println("---- RESET DETECTED ----");

  if (flags & RSTCTRL_PORF_bm) Serial.println("Power-On Reset");
  if (flags & RSTCTRL_BORF_bm) Serial.println("Brown-Out Reset");
  if (flags & RSTCTRL_EXTRF_bm) Serial.println("External Reset");
  if (flags & RSTCTRL_WDRF_bm) Serial.println("Watchdog Reset");
  if (flags & RSTCTRL_SWRF_bm) Serial.println("Software Reset");

  Serial.println("------------------------");

  RSTCTRL.RSTFR = flags;
}

I tested everything and it worked great.  Then tested it while running the engine at full power.  Still great.  This was a worthwhile change.

Header tank after welding... refinishing before installation.


Wednesday, 11 February 2026

Progress update... final stages

Well, progress has been steady.

Magnetometer and compass calibrated.  Magnetometer had to go back to Dynon, and they just sent me a new one.  I had standard AN bolts fastening the magnetometer, which are now replaced with brass.

The header tank sensors I used are... well... garbage.  Not going to live with that, so the tank is out and new sensors ordered.  Tank removed.  Parts arrive today (2/11), hoping to get the new bungs welded in tomorrow.  Have to create a circuit for the display.  Actually looking forward to that.  

Aircraft is at the paint shop for touch ups and polishing.  I still have access, but its on the other side of the field... lots of trips back and forth for tools.

Had a fuel leak around the pump assemblies.  Fixed.

Another brake leak on the park brake valve.  Fixed.  Need to top up the reservoir.

Prop settings updated for UL520T.  Was set for UL520IS.

Started log books / maintenance schedule / out of phase tasks.  Draft of prop log / maintenance schedule, etc complete and reviewed by peers.  Minor changes recommended.

Things left to do:

  1. Finish log books
  2. Print W&B
  3. Lower aft strut fairing fasteners
  4. Set fine pitch stop on prop.
  5. Aft belly inspection panel
  6. Document all control surface deflections.
After that, its time to get flying again and get my training plan ironed out.

Nice photo shoot on Sunday.


Monday, 19 January 2026

Multitasking all the issues that need resolving...

I think I am closing in on 95% done, 45% to go.  But that is progress, and that is awesome!

Problem with the header tank vent, so that is all getting pulled apart.  Wings are folded for the extraction of old system and insertion of new.  Had to get all the fuel out of the system, including the vent lines (which is the problem...)


Transponder (uAvionix tailBeaconX) was having some issues, and they sent me a new one (even thought it was out of warranty). Great people, great company.  Trying to set the new one up and having issues.  So another call to uAvionix will be happening soon.

Low point drains and plugs installed in outboard tanks.

Gear leg fairings are progressing.  Really enjoying learning how to 3D model.

Need to make a new crossover cable bracket.  The aileron crossover cable was JUST rubbing the cage.  Easy fix.

Installing the OAT probe.  Easy peasy.

New fuel pressure sensor on the way from Kaolin.

Things that are not started...

  • Weight and balance
  • Fuel flow test (dependant on new header tank vent)
  • Fuel tank calibration
  • Finish up wingtips
  • Full power ground run (tied down)
  • POH, paperwork
  • Final inspection
  • Redo anti servo tab on left wing
  • Rig ailerons
  • Check main gear toe angle
For the header tank vent... I disgorged the old lines.  The big challenge is going to be running a new vent line to the wingtip.  Another builder has done this by using one of the relief holes in the nose ribs.  Unfortunately I have used both of these from the outboard tank outward.

Thought about using a lightening hole in the nose rib with a large diameter tube and going through that.  But that is heavy.  Even bought material (and it was heavy).

Then I had the thought that there is a D shaped opening between the nose rib and the nose skin.  Found some nylon tube that was the right diameter.  We ran a fiberglass rod all the way down the D channel, and then fed the tube through on top of that rod to guide it.  We beveled one end and used that to fight our way through the ribs.  Easy peasy.

So now I have a path from the inboard to outboard of the wing.


Decisions to be made.  One wing, or both?  Ran the tubing down both wings in that event.  Easy enough to remove and readd later if needed.

Once the vent is plumbed out to the tip, do I merge it in with the exiting vents (prior to the check valve), or T it into the vent after the check valve?  That can be changed later easy enough based on testing.

Successful in piecing together all the bends to go around the spar on the left wing and out to the tip.


Next is running the new vent up the A pillar cage tube.

Final wing root layout and material.


Tried to fold the wings to make sure nothing rubbed or pinched.  Had to shorted the hose slightly to clear the wing hinge.

Finally after what feels like forever all the vent lines within the cabin have been rerouted and converted.  The port wing is pretty much done, now I can start the starboard wing.  Waiting for one fitting, then it will come together quickly.

In the interim, working on the final fitting of the wing tips.  There is a thin piece inboard of the counterweight that has a big half circle cut in it for the JD airparts vent.  It is just going to break, so I cut them off (well one had already broke) and they are screwed to the wing. Going to need a bit of touch up paint.

Finalizing the venting in the tips with the dedicated line coming from the header.

Wing tip finalization... fit nicely with the stupid flap permanently attached.


I was not happy with the rigidity of the vent lines in the tip, so make a bracket to hold everything in place better.


I am not sure whether to have the header tank vent plumbed into the main tank vents, or have it open to the outside.  With this bracket I can very easily reconfigure.  Will know soon enough.  Waiting for one fitting then I can finalize it all.


Monday, 10 March 2025

Fuel Tank Vents

This tasks has been on my mind for literally years.  Modifying a fuel system scares the crap out of me... 

I have a header tank... purpose of the header is to simplify the fuel system.  Fuel injection return can simply go back to the header and does not have to go all the way to the main tanks.  Can also use a simplex fuel valve, and not a duplex.  Also adds some weight up front, and 2 more gallons of fuel.

So the vents... per the manual, run the vents out the bottom of the wingtip using either aluminum tube or the plastic line.  It is well known that this vent system will leak when (1) the tanks are full, (2) parked on a slope, or (3) daytime heating when the tanks are full.

The TWTT instructions modify the vents from the original manual.  The vents are T'ed together, and you run the vent line up as high as possible under the tip.  This is better.

On the forum, many have modified the vents using a 'bleed' type check valve prior to exit.  Lets lots of air in, only lets a little bit of air out.

Lastly, the underwing / tip exit has caught many on the noggin.  The aluminum tube vent is the worst.  Some builders are now using under wing machined aluminum vents designed for RV's.  These are nice as they have a screen, 2 vent holes (1 facing forward, and a backup at the rear).


Link to JD Airparts Site Here.

So my plan is to incorporate ALL of these.  T the vents, check valve, and under wing machined vents.

My worry... the vent for the main tanks and header tank work OPPOSITE from a venting persepective.

For the main and aux tanks, the vents let air in so fuel can depart.  For the header, the vent lets air out so the header can fill.  I'm worried they will fight each other... but we will see very soon I hope.

The bleed type check valve is key.  It definitely lets some air in.

On the flip side... the pumps will create some suction and draw fuel through (I hope).

I mocked one vent assembly up last night.  Everything fits under the wingtip.

I used a 1/8" NPT male / male into the tank.  A 1/8" NPT 'T", then a 1/8" NPT to AN4 female for the check valve, and a 1/8" NPT hose barb on the other end. Going to feed the nylon line into 14" hose and clamp it to transition from the vent line to the "T".

First one (left wing) complete.


Was somewhat worried about edge clearances on the -4 fitting that holds the vent to the bottom skin.  May reinforce it... will see.

(The wings are folded currently...)

I reversed the direction of the check valve... what is shown in the picture is backwards!  That would have been disastrous...

Sunday, 2 March 2025

Fuel system delivery testing and results

Spent Saturday, March 1 2025 testing the fuel system.

Bottom line:  Good new, and news.  The news is yet to be determined if good or bad.

Needs:

  • Everything is going to be in Liters.  It’s just easier.
  • Then UL520T needs 68 Liters / hours (based on 0.3 Liters / hour / HP)
  • Using a 50% safety factor.  Gravity system needs to deliver 102 liters / hours
Test setup
  • Fuel system emptied of all fuel, except anything unusable (specifically header tank).
  • 20 liters added to each main wing tank
  • Check valves installed in header tank vent, with directional arrows pointing away from the header
Header fill
  • Took just shy of 6 min to fill header tank.
Test 1
  • Drained 20 Liters into Jerry can at firewall, same level as exit.
  • Fuel selector on BOTH
  • Gravity only.  Tailwheel on the ground.
  • Time:  8.8 min, which equals 136 Liters / hours.
  • Pass (102 Liters / hour needed)
Test 2
  • Drained 20 Liters into Jerry can at firewall, same as test 1
  • 20 Liters added to left tank
  • Fuel selector on LEFT.
  • Gravity only, Tailwheel on the ground
  • Time:  11.2 min.  107 liters per hour.
  • Pass
Test 3
  • Completely drain useable fuel from header
  • Add fuel to both tanks.
  • Test fuel consumption with header low
  • Upon setting up for this test, with fuel selector OFF, header tank would not drain.  This is due to the check valves blocking the vent path.
  • Test fail.  
  • Not sure if this is a bad thing or not.
Test 4
  • Repeat of test 1
  • 8.7 min, 138 liters / hours
  • Pass
Test 5
  • Fuel selector on both
  • Fuel pumps connected to firewall bulkhead connector
  • Fuel line from engine disconnected.  Fuel pumped from gascolator into Jerry can.
  • 20 liters pumped
  • 4.92 minutes, 244 liters / hour
  • Pass
  • This is an unreasonable test.  The header low warning lights came on… the first one at 2/3rds came on after 1.76 min.  The 2nd one came on after 3.73 min.  There is no scenario where this would be needed… I wanted to see where the header tank could not keep up with the demand, and I found it.
  • It took 6.6 min for the header to fill back up after the pump was shut off.
So what did I learn from all this:
  • The check valves on the header tank solve the problem of fuel coming in via the vents.  This also solves the cross feed problem.
  • The header tank fills slower than I would like.
  • In no reasonable scenario tested did the header ever show a warning.
  • Even on 1 tank, there is enough fuel delivery for full power fuel consumption plus a 50% safety factor.
  • All my tests were with a maximum of 20 liters / 5 gallons in each tank.  This test needs to be performed with FULL main tanks (60 liters per side).  This should add significantly more head pressure.

More testing needed, but so far the system works.  Need to change some variables and test again.


Saturday, 1 March 2025

Header tank venting...

Well, I have backed myself into a corner.

Further to the last post about the header tank vent(s)... current design (T'ed into the vent for the pillar header and to each main tank) is not going to work.  This will lead to cross feed and an ineffective fuel valve.

What are the 'truths'.  Things that I know are facts:

  1. The header needs to be vented to allow air out so there is room for fuel to enter
  2. The vent point should be higher than the highest fuel level
  3. The current configuration will allow bypassing of the fuel valve, and cross feed on the tanks
Options:
  1. Check valves on the header vent between the pillar header and the main header.  This will stop fuel from the main tank / pillar header from each side entering the header.  It will allow air to escape IF the air pressure is greater than the head pressure from the fuel.
  2. Mast vent on the center line with the exit above the wing level.  This presents an opportunity for fuel siphoning out the vent.  No bueno.
  3. Using Paul's method run a new vent line out to one wing tip.  This is problematic, but doable.  In theory this solves all problems.
Option 1 is easy and cheap to try.
Option 2 scares me
Option 3 is more work but most likely the best solution.

4th option:  Modification on option 3... run a vent line out and T into the outboard vent on the main tank.  This is more doable, but assumes I have access through the forward spar to fish the new vent line through and T it in.  Need to look at old pictures to see if this is possible.

Yesterday (February 22) I installed a check valve on the starboard header vent.  Aircraft spruce check valve that has no spring, gravity only.  Arrow points towards the main tank to let the air out.  I was going to install the port side, and realized I only ordered enough fittings for one side (ordered 2, needed 4).  So those are now ordered.

Prior to installing, I wanted to get the fuel out of the vent lines.  After grounding the aircraft and draining all the fuel from the belly low points and header, closed the main fuel selector to OFF, and pushed compressed air into the header from the firewall fuel line fitting.  That did the trick... when cutting the vent line, there was no fuel.  WIN!

Now waiting for the other fittings to arrive to do the starboard side.

I am very concerned about fuel delivery.  This needs to work and work well.  No compromises here.

2nd check valve installed (Feb 28).  Fuel ready to go in the tanks... first will be a leak check, and then a fuel delivery check.  See how much I can actually deliver.

I am getting more stoked / positive on option 1.  In theory, when the pumps are drawing fuel from the header, it will create suction... which will pull the check valves closed... and actually draw fuel faster.  At least that is my theory.  Will see if it holds true.  Stay tuned...

Sunday, 2 January 2022

Header Tank

 A lot of this is covered in the 'Fuel System' post, but there are some additional details on the header tank - specifically the systems that measure fuel level in this post.

From a mounting perspective, the header is mounted on the forward tunnel just aft of the firewall.  Tabs have been welded on the top of the tunnel truss with captive fasteners (#10) in 4 places.

I mocked it up in wood to begin with to figure out the overall fit.


The pumps and filter fit under the header.

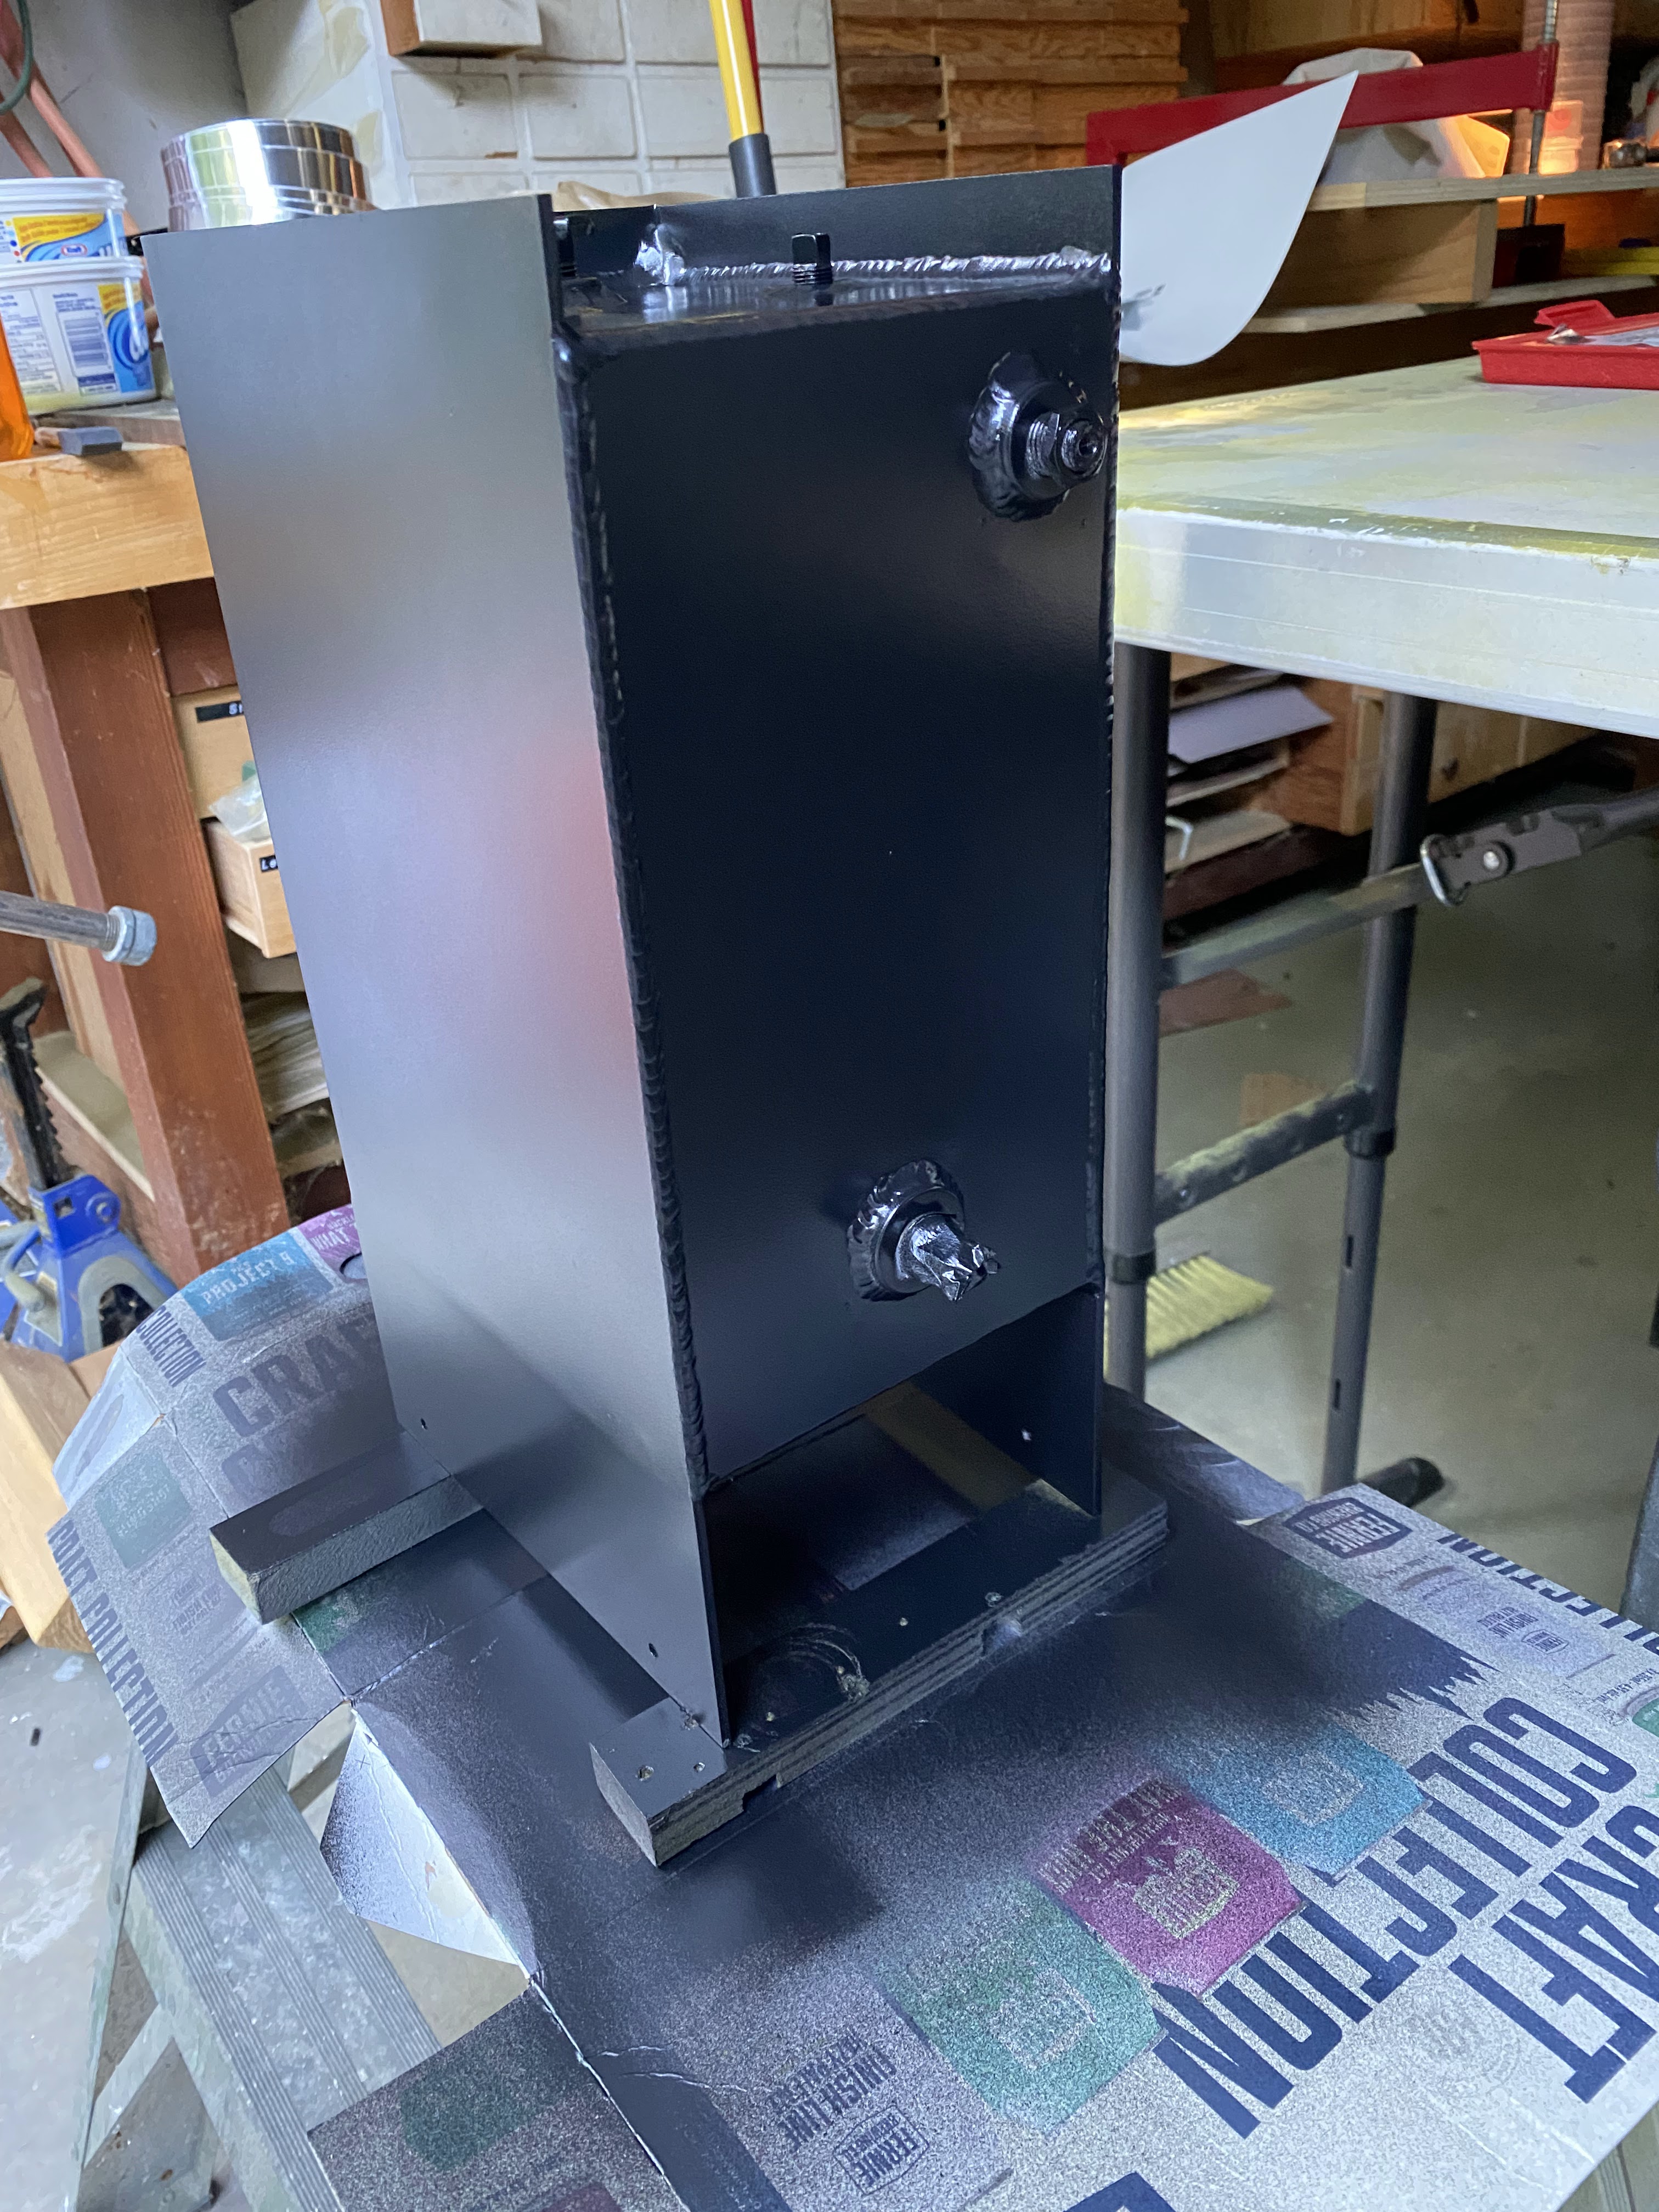
A friend of mine got the header made.  He had a shop bend the aluminum, and then he welded up the header.


Post tab welding


After finishing (tank was treated with Alumiprep and Anodyne, then primed, then painted).


My big concern with a header was knowing how much fuel is in it, and more importantly when it gets low on fuel.

In my panel design, my original plan was to have a capacitive probe in the tank to know how much fuel is in it.  Unfortunately, Advanced only supports 4 tanks (and I have 5 - 2 mains, 2 aux, and 1 header).  So I needed another solution.

Enter Radiant Instruments.  They have a number of innovative fuel probes.  My issue was I did not have room for a fuel gauge, so I decided to use fuel level senders (that basically say there is fuel at a given level, or not) with their LED indicator.  The indicator says "there is fuel, or there is not fuel".  2 of these mounted on the tank will tell me if I ever get the header too low.

So now the discussion goes to where to place them, which leads to fuel flow, header capacity, and time between warnings.

Current workbook with calculations:


Current sensor locations and indicator mess.


Bottom line(s):

  • From my calculations, the fuel system can deliver 63 GPH to the header.
  • At full power, the engine should draw about 22 GPH
  • If you get the initial low fuel indication on the header (which is right in front of the pilot), you have 1.66 minutes to correct.
  • When the 2nd sensor shows low, you have 1.44 minutes to correct.
  • The header has fuel for 4 minutes at full engine power (220 HP)
These are all calculations at this point.  Proof will come on the first flight.  But, based on these numbers you should NEVER see a low fuel indication on the header... ever.  Famous last words...


Panel header fuel level indication above the pilot side display.  Very simple.  Green = good, Red (flashing) = Bad.

Header tank in place with lock on the shutoff valve.  Also doubles as a mount for vertical fuel line.


So after a lot of messing around (and many months), it is finally in its (hopefully) finished configuration.  All fasteners are installed.  The only thing left to do is wire the fuel pumps, which I may do today assuming I have all the stuff.


Now it is onto the vent lines...