Search This Blog

Wednesday 24 March 2021

Interior Repaint

 In 2020 Glasair came out with a new 'Interior' for the sportsman.  New cage color, new seat color, and new interior color.

I plan to leave the cage 'as is' (aka light grey), but 'darken' the interior fibreglass to match the new style.  I really don't think I can get good coverage on the cage with it installed, so am going to leave well enough alone.

Glasair uses a Sherwin Williams product - 'JetFlex', which is a proper aviation interior paint.  This stuff is expensive - like almost $500 CDN / gallon (plus catalyst and thinner - $700 all in).  And then they top it with Zolatone.  My interior already has Zolatone (aka texture), so I started playing around with putting the JetFlex on top, to see how it comes out.

Bulkhead A with factory (quick build) Zolatone.


I cleaned it, and then rolled the JetFlex on using a smooth foam roller.  I contemplated spraying it (which is recommended), but since JetFlex is self levelling I figured I would try rolling it.  I am quite happy with the results.


It shows the inconsistencies in the fibreglass... but will you see it?  I dunno.  This was a test piece, as I am probably going to upholster the bulkhead anyway.

Need to noodle on this a bit more, but I can see a plan coming together.

Bottom line is I want the entire interior repainted before moving on to installing systems (or reinstalling), because I have removed almost everything to get to this point.

Test #2:

I took the rear (pilot side) door.... sanded and cleaned it thoroughly, and rolled / brushed the JetFlex on.

Rear door prepped and cleaned:


After painting (aka rolling):


This is still wet.  Next picture is after drying overnight:


All I can say is 'WOW'. Total transformation.

The reviews I read on JetFlex are pretty good.  Really good wearability, easy to put on, etc.  So far I agree with all of these statements.

The trick seems to be prep (isn't it always?).  I spent an hour sanding and cleaning, and probably 25 minutes mixing / painting / cleanup.  I am REALLY happy with the results.

There are a few bits off 'yuck' in the finish, but they are minor.  Overall it is pretty damn good.

The MDMS says it will dry to touch in 15 min at 25C.  In March with the outside temperature at 5C, and the heaters screaming I could barely make 20C.  I rolled it once, re-wetted the roller, and went over everything 2 more times.  Closed the doors with the heat on and walked away till the morning.  

But, this stuff stinks really bad for about 24 hours, and then it all goes away.  The Zolatone seems to make a pretty good base / primer to apply the JetFlex on top of.

Next I am going to do the two front doors, and then move on to the rear / baggage area.  Will sand and fill as required, mask off all the hard points, and roll away.  Then will move on to the forward area... which will be a lot more challenging.  Hope to have all this done in the next 1.5 weeks, then I can start putting everything back in and get to the fun stuff.


Not finished yet, but its a lot of the way there...


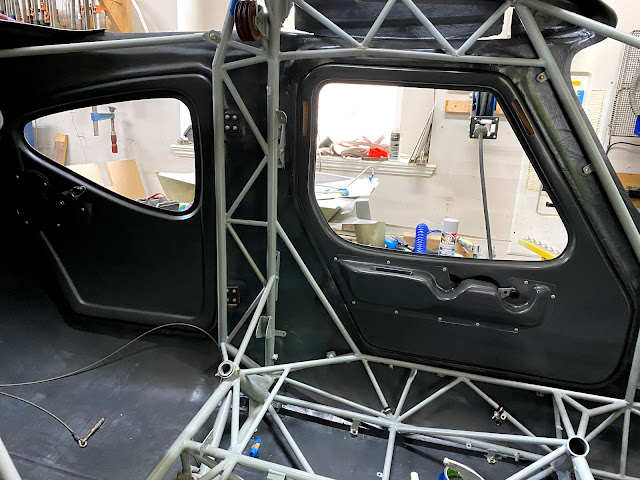
First front door complete (co-pilot).  I will replace the screws one day with dark / black screws... but for today, this is good enough.  This pic gives a good comparison of the before and after...


I did the repaint in sections.  Doors were done individually, but for the fixed interior I did the rear first as it required the most sanding / filling.  Then I did the roof and door pillars, down to the top of the seat rails, then the floor and forward of the doors.


Last section.... below the door sills, forward cabin floor, and up to the firewall.


Need to do any spot touch ups on the fuselage, pilot door, and redo bulkhead A.

Honestly I don't know if I would do this again.  It has taken weeks to remove everything, sand, fill, prep and paint.  The results are pretty good, but not stellar.  But, it is a lot better than what it was, so I guess I am satisfied.  It was a lot of time and expense for 'meh'.  Maybe I am being to critical.  BUT, its (almost) done, and then I can get onto reinstalling everything and moving onto the next step(s).

Last pic.... pilot side doors all done and temporarily installed...


Now everything else had to be re-installed... but I am pretty happy with the results overall.

The back has gotten a bit dusty with all the moving around of dusty 'stuff'.


Tuesday 16 March 2021

Seat Belt Service Bulletin 69

Service Bulletin 69

I opted for the 'weld up' option, and everything is open and exposed, and its lighter.  Plus I wanted to do the gear truss (welded) upgrade, so might as well go all in.

The short version of this SB.... in the forward seat position, the angle of the belts is not ideal.  This doesn't really apply to me (with the seat all the way back), but figured I might as well do it.

There are 4 components to the upgrade:

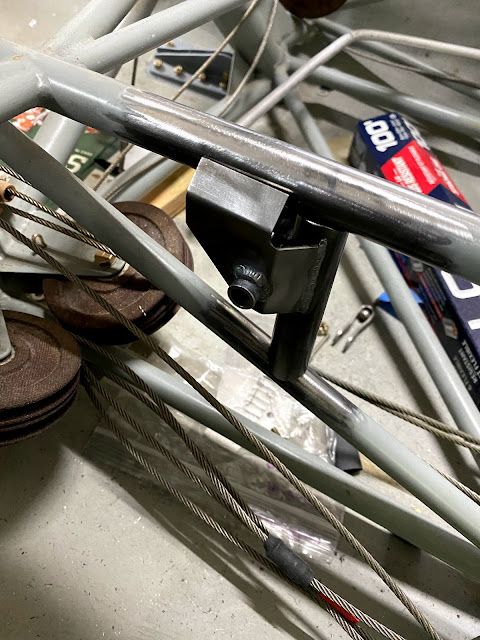
1. Center post that is welded into the centre truss.  Provides the inboard lap belt tie in.

2. Outboard mount points (x2)

3. New (longer) seat belts.

The first part of the upgrade is pretty simple, as it almost centers itself in the centre truss.


The outboard mount points are a bit trickier, as they are in 2 parts.  One is a plate with a sleeve, and then a 2nd plate gets welded on after.


As per usual, once everything is located you need to gently remove the paint, and prep everything for welding.


Once everything is prepped, I used weld through primer on all the surfaces that you won't be able to get to after the fact.


And all finished....


Monday 8 March 2021

Tail Pull Handle

Airplanes have a lot of places you shouldn't push / pull on.  On high wing aircraft, you have the struts which works great with 2 people.  For trikes, you can use a handle on the nose wheel.  The prop works, but has risk associated with it.

Some tail draggers have retractable handles on the rear fuselage.... a Tail Pull Handle... 

B.A.S. makes one for the Sportsman.  They are a pretty simple concept.  Essentially it is a tube that mounts on the airframe, with small retractable handles (another tube) that you can use to push / pull the airplane around.

Ted Setzer wrote this up for the forum, and as usual I am following his trail.


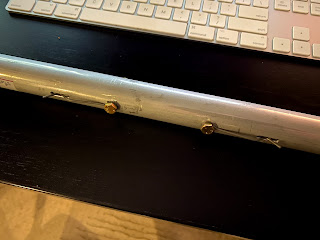
There is a .09 stainless wire that stops the tube from popping out.  On the inboard side, there is a bolt that goes through the outer tube and the wire is wrapped around it.  On the handle side, the wire is welded to a washer.

Step #1 was disassembly... I ended up unbending the wire around the bolt, with the hope of wrapping it back around after the handles have been anodized.

Step #2 is drilling the mounting holes in the fuselage.  You crawl in the fuselage with a hole saw and drill the first hole up against the forward side of bulkhead B.  Then I got out and put the tube into the first hole... using a small level I marked the top of the other side and drilled it next.

I started the holes on the inside, through the inner layer of glass.  Then I finished the hole from the outside.  The act of drilling the inner gummed up the hole saw enough that I had to get out anyway to remove the debris.

I used a 1 1/8th hole saw.  The outer tube is slightly bigger than 1 1/8.  I tested on a thin piece of wood first, and it was right on the money.


Step #3:  Getting the handles anodized.  I unwound the wire and extracted the retaining mechanism and sent the handles off.  They are nice and black.


Step #4:  Reassembly.  I put the whole thing back together and then filled the cavities in the fuselage with a mixture of resin, cabosil, and milled fibre.  Then inserted the handle from the inside, and filled the gaps between bulkhead B and the handle.


To be clear, I reassembled the anodized parts BEFORE I bonded it in place.  I just could not see an easy way to do this after the fact.  Hopefully I don't regret this decision...

Step 5:  Fiberglass reinforcement over top of the handle to bulkhead B.

Step 6: Trim the excess handle on the outside of the fuselage.  I put aluminum tape around the hole to start with to act as a buffer between the sanding disk and fuselage.  Once I got to that level, I removed it and trimmed the last little bit very carefully.  I did all this with the handle installed, so I taped up the handle and put a towel inside.  I sucked out all the shavings with a shop vac before removing.


Thursday 4 March 2021

Gear Truss Upgrade

For those of us that plan on running big tires and fly off airport, extended / heavy duty gear legs are available from Langair for $1100 a set.  Mine are on order, and will hopefully be delivered in a month or so.

My plan is to run 31" Alaska Bushwheels...

Side note:  My current aircraft is a low wing, taildragger with wheel pants.  I have never flown 'off airport', but have gone into some pretty gnarly strips considering I have 600x6 tires that are covered.  I have suffered quite a bit of wheel pant damage, and have spent a lot of time repairing and repainting them.  I plan to do this no more.  My goal for the sportsman is to be able to go wherever I want.  On airport, off airport, etc.  I am probably not going to be going into horrible places that you should just not attempt to land...  I dont need insane performance... I want the aircraft equivalent of a capable 4x4 that will get you 95% of the places you ever want to go...

My fuselage is ~2006 vintage, and was never designed for bigger gear / big tires.  Ted Setzer developed a mod to the gear truss to add significantly more strength.  During the design of the original Glastar, the plan was for the gear to fail before the cage.... this mod allows that philosophy to remain true.  There has only ever been 1 documented case of a cage bending due to a bad landing.

The mod applies to the forward (taildragger) gear truss.  I took a piece of 1" OD, 0049 wall 4130 tubing and split it down the middle on a metal cutting bandsaw.  You then proceed to make caps that go overtop of the existing top / bottom tubes of the truss.


In Ted's explanation of the process, he put a cap on the TOP of the bottom horizontal tube.  In looking at this, it seemed to make more sense to put the cap on the bottom for a couple reasons:

  1. There is a huge 'knuckle' in the center on the top of the bottom tube where 5 tubes meet.  There is no way to have a consistent piece of tube through this section.
  2. By placing the tube on the bottom, there are less obstructions and in theory you will get more strength.
  3. You can now weld facing DOWN instead of facing up.
In order to tie in the gussets on the gear sockets, I made some small 4" caps that will tie all that together nicely.  Originally I planned on a separate cap to tie the top and bottom caps together, but after asking Ted he said it was overkill, so I stood down.

The fitting process took awhile, but was not hard.

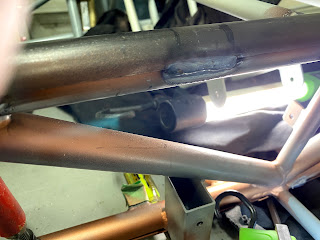
I had to very slightly grind down the factory welds on the top tube so the cap would fit flush.

Once I was happy with the overall fitment, I used a sharpie to mark the intersection of the caps and factory cage.  This is where the finish needs to be removed.  I think this was MORE work than actually fitting the tubes.


Started off with a scotch brite pad on a die grinder.  This worked well is all the areas I could reach.  From there, it was various sized wire wheels on a Dremel.  I went through a lot of wire wheels.

Final result before welding.


The INSIDE of the caps have been primed with copper weld through primer.  Out of interest, they weight 555 grams (1.2 lbs).  I estimate that once welded and finished all of this should add about 2 lbs.  Well worth it in my opinion.


Below are a bunch of pictures of the welding process.  This is going to make it super strong...  Thanks to my brother in law (Shane) for giving up an afternoon to do this for me.


All the welding is done.... now onto cleanup and priming.  Knocked off all the 'boogers' (as my brother in law calls them) with a combination scotch bright pads and wire wheels.  Using a sanding disk for the largest 'knobs'.  Using a self etching primer to halt the corrosion..... 


The downside to putting the lower caps on the bottom of the truss is ability to prime / spray.  Using a brush to get to the bottoms.  Fortunately the insides are all primed before welding.

Our local auto parts distributor (Lordco) mixed me up a batch of paint in a 2K can (with hardener) and it is really close.  A bit more glossy than the original, but you will never see it.

Final result: