For those of us that plan on running big tires and fly off airport, extended / heavy duty gear legs are available from Langair for $1100 a set. Mine are on order, and will hopefully be delivered in a month or so.
My plan is to run 31" Alaska Bushwheels...
Side note: My current aircraft is a low wing, taildragger with wheel pants. I have never flown 'off airport', but have gone into some pretty gnarly strips considering I have 600x6 tires that are covered. I have suffered quite a bit of wheel pant damage, and have spent a lot of time repairing and repainting them. I plan to do this no more. My goal for the sportsman is to be able to go wherever I want. On airport, off airport, etc. I am probably not going to be going into horrible places that you should just not attempt to land... I dont need insane performance... I want the aircraft equivalent of a capable 4x4 that will get you 95% of the places you ever want to go...
My fuselage is ~2006 vintage, and was never designed for bigger gear / big tires. Ted Setzer developed a mod to the gear truss to add significantly more strength. During the design of the original Glastar, the plan was for the gear to fail before the cage.... this mod allows that philosophy to remain true. There has only ever been 1 documented case of a cage bending due to a bad landing.
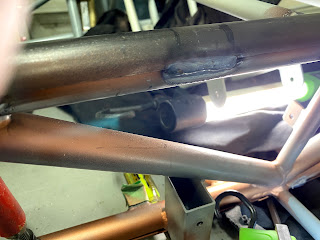
The mod applies to the forward (taildragger) gear truss. I took a piece of 1" OD, 0049 wall 4130 tubing and split it down the middle on a metal cutting bandsaw. You then proceed to make caps that go overtop of the existing top / bottom tubes of the truss.
In Ted's explanation of the process, he put a cap on the TOP of the bottom horizontal tube. In looking at this, it seemed to make more sense to put the cap on the bottom for a couple reasons:
- There is a huge 'knuckle' in the center on the top of the bottom tube where 5 tubes meet. There is no way to have a consistent piece of tube through this section.
- By placing the tube on the bottom, there are less obstructions and in theory you will get more strength.
- You can now weld facing DOWN instead of facing up.
All the welding is done.... now onto cleanup and priming. Knocked off all the 'boogers' (as my brother in law calls them) with a combination scotch bright pads and wire wheels. Using a sanding disk for the largest 'knobs'. Using a self etching primer to halt the corrosion.....
The downside to putting the lower caps on the bottom of the truss is ability to prime / spray. Using a brush to get to the bottoms. Fortunately the insides are all primed before welding.
Our local auto parts distributor (Lordco) mixed me up a batch of paint in a 2K can (with hardener) and it is really close. A bit more glossy than the original, but you will never see it.
Final result:


No comments:
Post a Comment