Search This Blog

Friday, 28 February 2025

5 weeks to paint...

It's getting real.  Like really real.  5 weeks... 5 weekends.  The time is NOW...

Time to get more organized.  Found a stick on magnetic white board on amazon... its now affixed to the hangar door.


It's not pretty, and I don't care.  It will keep me organized.  If I think of something, it goes on the board.

Lots to do...

There are 3 posts that are 'in progress'.  Not that many people actually read this ;-)

Tuesday, 18 February 2025

Hatch Covers

HUGE shout out to Zach Chase.  Thank you for the guidance!

I was struggling with these darn covers.  Could NOT get them to line up.  After hours of head scratching, I finally figured I needed to cut the lower cover outboard edge.  That was the ONLY way to get them to fit correctly... but before doing so, I needed to talk to Zach.

As always, Zach is the master and so generous with his time and advice.

He said these covers to NOT fit well, and the only way is to cut them.  He is even more aggressive that I was planning.  Cut the vertical piece on the lower hatch cover at the outboard edge.  Hold it in place with tape or popsicle sticks (with hot glue).  Use a mixture of resin, cabo until its mayonnaise consistency, and add micro balloons until its like peanut butter.  Relatively strong, yet sandable.

So I did.  Port cover aft edge is bonded in place.  While it was drying, started fitting the starboard cover.  The 2nd one is always easier than the first.


Once the trailing edge has cured I can shape it to match the flaps.  It's slightly too long.

41 days until paint shop booking.

Things to get done:

  1. Finish hatch covers
  2. Finish wing tips
  3. Finish rudder base fairing
  4. Finish horizontal stab fairings
  5. Finish fuselage pockets for flap tracks (when wings folded)
  6. Elevator and trim tab hinge keepers
  7. Strut fairings
  8. Flap track fairings
Lots to do... grateful for the challenge.

Sunday, 16 February 2025

More Progress... some frustrating, some not...

Well, the progress keeps coming... slowly.

Loaded all the UL520T parameters into the EFIS today.  Not hard.

Downloaded the checklist file... that will be left for cold days to come.  The checklist will be interesting... looking forward to that.

Brake leak appears to be fixed... but ANOTHER fuel leak.  Traced it to the fuel selector.  Everything cleaned, now waiting to see if it reappears.  I fixed it late morning, and there was nothing by dinner time... 

Lots of visitors today... lots of airplane talk.

Then I decided to tackle the hatch covers.  Watching the videos, those just need to get done.  I have had a mental block on these... I started fitting the port side cover ages ago, became frustrated and left them.  More frustration today... they just do not want to fit nicely.  Call to Zach in order for tomorrow morning.

Looking at the forum, this sounds like a common issue...


Saturday, 15 February 2025

2nd Engine Start, Debugging and First Taxi

Another good day today.  Video here.

First off fixing things... 

  • Brake fluid leak at the park brake.  Tightened, and added additional fluid.  Tested brakes, all good.
  • Fuel leak at the banjo fittings on the collector to the pre-filters (before fuel pump).  The leak had soaked the fire sleeve on the hose.  Replaced the fire sleeve, rebanded the fire sleeve, and reinstalled.
  • Checked the EGT/CHT connector on the EMS.  Tight.  Checked the EFIS, and all 6 EGT's and CHT's appeared to be reading OK.  More on this later...
Purged the system of air by running the pump for a bit.  I didn't get it all out, as it was a bit cranky to start.  Ran fine.

Once warm, went up to 1800 RPM to do a 'mag' check... just check each ignition system.  Right ignition system running rough and backfiring.  Left it on the left side (ignition 1).

Same issue as before.  4 EGT's and 2 CHT's not working.

Went up to 2000 RPM on a single ignition.  Ran smooth.  9.6 GPH, 40.3" manifold pressure.  CHT's in mid to low 200's, EGT's mid 1300's.

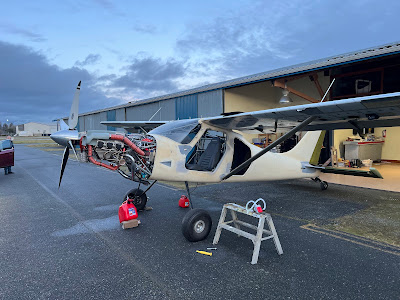
After letting the turbo cool, we put the cowling on.  I want to check for any interference issues with it running... anything to fix now before paint.  Cowl went on super easy.

2nd run was cowled.  After warm up, went to 2000 RPM, and then briefly up to 2200 RPM.  Arms started waving to shut down... the wing nut clecos were departing the windshield.  
2200 RPM
  • 40.3" manifold pressure
  • Fuel flow 12 GPH
  • Manifold inlet temperature - peaked at 29.8 C
  • EGT's - mid 1400's
  • CHT's - low 200's
Checked both COM's.  No static at all on TX or RX.

Did a quick taxi, because I could :-)

Post run diagnostics.
  • Ignition issue was 2 plugs swapped (4 and 6).
  • CHT / EGT issue tracked down to polarity.  I remember when installing them and thinking about does polarity matter?  At the time I thought not... now I know.  Fixed and tested with a heat gun.
  • No leaks
  • No rubbing
  • No burning
  • Turbo exhaust pipe has a shake.  Needs an additional mount.
Other than that, a success.

Thursday, 13 February 2025

PAINT!

OK, I am excited.  To actually be talking about paint and to have a date.... OMG.

Working with a paint shop and Langley Airport.  Shaun came by the hangar last night to take a look at the project.  He has no concerns.  I have to fix up some fiberglass work, but that should be relatively easy (just time consuming).

They are going to alodyne the rest of the wings (all the interior has been done, and on the exterior of the aluminum surfaces I alodyned all the rivet lines).  Shaun is committed to making it look good.  He wants his shop (which is relatively new) to have a good reputation.  I am REALLY GOOD with that!

First sketch


I want more yellow... Shaun loves doing this stuff, and I am grateful for the ideas and the help.

Pinnochiio (her name) going into the paint shop on March 31 (Dad's birthday!) - or there abouts.  They may be ready a few days early.  Need to adjust my vacation...

Well I finally had some time to dedicate to paint schemes... using Autodesk Sketchbook.


Not finalized yet... but I like the direction.


Tuesday, 11 February 2025

Post First Engine Start - Review

The day after the first engine start I took a detailed look at everything firewall forward to see what I could see.  Overall, results were positive.

  • Slight fuel leak on the banjo fittings going into the pre filters (before the fuel pumps).  This leak has soaked the firesleeve on the line between the inlet and the firewall.  Will replace that firesleeve.
  • Everything prop related looks good.  Nothing untoward on the slip ring.
  • No chaffing on any wires
  • 3D printed inlets attached to the plenum show no signs of heat distortion.
  • Exhaust looks good
  • The engine puked its preservative.  This primarily came out of the slip joints on the exhaust and appears easily cleanable.
  • Oil level is good, and no discolouration at all.
  • Oil cooler appears good
  • Overall, everything survived AOK.
  • Downloaded the logs from the EFIS and loaded into Savvy.  EGT's 2, 3, 5 and 6 show 0.  Need to check configuration and/or wiring connections.  CHT's 3 and 5 also show 0.  Same check.
    • Note:  Advanced has added functionality that every engine parameter can be picked up off the CANBUS or discrete sensors.  Everything in my configuration is coming off the CANBUS EXCEPT the EGT's and CHT's.  I may have not flipped the ones showing 0 to discrete sensors through the EMS.
  • Talked to Tracy who has the same engine / prop and is flying.  He noted my MP is higher than his.  I had some of his logs and checked, and yes - about 2" higher.  But it was far colder (density altitude -980 feet the day the engine was fired) and very close to sea level.  This is something to watch.
  • Fuel flow at idle 1.6 GPH.  Fuel flow at 1500 RPM 4.1 GPH.
  • Weeping at the fuel drains on the main tanks.  Not surprised as I did not seal them as they are coming out for paint.
  • The header tank has 2 ultrasonic sensors to show fuel level.  The 1/3rd sensor warning goes off when the pumps are running.  Guessing this is due to turbulence at the tank due to suction from the pumps.  The 2/3rds is rock solid.  Tested this with the engine not running and behavior is the same as when the engine is running.
  • Fuel pressure consistent in the mid 30's.
  • I have two current sensors.  One shunt that shows everything to / from the batteries, and one on the engine bus (hall effect sensor).  At idle, the engine bus (ECU, coils, pumps, etc) was pulling 9 amps.  At 1500 RPM, 11 amps.
Overall, the only thing that needs to be 'fixed' is the leak, and the problematic EGT's and CHT's.

Saturday, 8 February 2025

First Engine Start!

The day finally arrived!

Was not sure it would happen today... we had snow this week, and needed to clear the snow to be able to get the plane out.  Huge thanks to Geoff for clearing most of it with his ATV and plow.  SO GRATEFUL.

We had tested the fuel system to the firewall, but not the engine side.  So that had to happen first... Had a few leaks, but one that was a bear.  Something was leaking at the gascolator.  When I made the mount, I copied the Glasair design.  Usually the gascolator bring fuel from the firewall, but in my case that is NOT the case, to the bracket that holds it is offset from the firewall, and there is a 90 degree NPT to Flare fitting on the rear of the gascolator.  That is what was leaking... The fitting was not tight, and was not sealed.  That meant that the gascolator had to come off.  Long story, but that is now fixed.

Fixing that fitting meant taking off the fuel lines, which meant air was introduced into the injection rails... which meant it did not want to stay running until we got all that out.  Eventually it happened.  Oil pressure came up no problem.  Manifold Air temp was showing about 10 degrees above ambient.

I have very little (ok, NO) turbo experience.  Idle speed was 910 RPM, at just over 30" of MP.  At 1500 RPM, 34".  That just looks weird.

Charging system is working.

Prop is working.

CANBUS is working.

Pretty exciting day all around.  So damn grateful for all the help.

Video HERE.


Saturday, 1 February 2025

Getting ready to awaken the beast...

Getting ready to start the engine.  So today was all of the little things leading up to that.

Checked all the fuel fittings, then put fuel in one side to test fuel delivery to the header.  I forgot to tighten up the banjo fittings on the fuel selector, so it pissed fuel all inside the fuselage.  Took me a minute to get it tightened once I realized where it was leaking.

But the big problem...  The fuel selector was in the OFF position, and I could hear fuel going into the header.  I immediately thought it was a problem with the selector.  After some head scratching, we pinched the fuel vent line, and it stopped.

I have the pillar headers, which are vented to the mains.  I T'ed the vent off the pillars and ran down to the firewall header.  Fuel is going into the header via the vents.

In hindsight, this makes perfect sense.  But this is not a flyable configuration.

My first thought is to put a check valve on the vent line between the pillar header T and the firewall header.  But I don't think this is ideal either.


But it is a place to start, and I will learn something.

We did accomplish cleaning out any 'sworth' in the tanks, which was minimal.  Inboards only.  Will do the outboards another day.

Next is to come up with a plan to correct the vent situation.  In parallel pressurize the engine fuel system and check for leaks.  I can start it with the vents as is.


Airmaster Prop - Service Bulletin #22

I tripped across a Service Bulletin from Airmaster (SB #22).  

The issue:  In 'high vibration' environments / engines, the brush assembly in the motor can crack.  This SB affects version 1 and 2 of the pitch change motors.  I have version 2A.

Discussing with the US distributor, he had not heard of this SB.  He also mentioned that because the UL engines are so smooth this should not be an issue.  However, might as well do it... the irony is I had just torqued the hub onto the flange the day I discovered this.  No big deal, except I will need some new nordlock washers.

The procedure is very detailed on how to extract the motor.  I opted to take everything apart (the procedure says it can be done in place).

Only 1 issue:  In step 4, you remove the 'riv-screws' on the motor clamp with a 2.5mm hex key.  The first one came out no problem.  #2 just spun.  #3 came out fine... and the rest just spun as well.

I called Airmaster... they have never seen this before.  "Do whatever you need to do to remove the rivscrews, and we will replace whatever parts are damaged.".  We agreed that an easy out would do the job... it was 7PM at night when I discovered this (in a cold dark hangar), so figured I would do this the next day.  As I was packing up, I had the brainwave that a thin slotted screw driver tapped into the head with a hammer may do the job... and it did.


Back in business!  Everything packed and ready to ship.  Airmaster says the upgrade will take about a week once they receive it.

They received it on Fri, Jan 17 2025.  Return ship on Thu, Jan 23 (NZ time).  Should have it on Wed, Jan 29.

Per Airmaster tech support, they have replaced my motor with a new Maxon carbon brush motor as it 'is more suited for my engine'.  Both Tracy and Ray have been running with the Faulhaber motor for YEARS... so I asked why?  The new motor is a carbon brush motor, and is 'worth more' than the previous.  Cut and paste from the email...

The maxon motor you are receiving is also a carbon-brushed motor, however we have modified the original design so that it is more resilient to vibration, this is due to the implementation of thicker brush braids, higher-pressure springs, and an overall more resilient design that puts less strain on the brushes leads.

The UL520T engine may be considered smooth but it is still a direct drive engine so there is less of a damping effect on the prop.

Will see... looking forward to it.

On a related note, in talking to Ray, Airmaster is working on a new controller that will interface with the ECU and provide true 'one lever' operation.  This will allow constant speed props to be used with LSA (in the US).  Sounds very cool...

Motor received back from New Zealand!  Reassembly fairly straight forward, except that the motor wires on the new assembly are in a different location, and require different routing.


The above pic was simply to check I had it right... sent to Jack @ Airmaster for confirmation.  Now I can route everything neatly and finish reassembly.

Prop is all back on and done and tested.  Glad this one is behind me.