The UL power engine needs lots of oil cooling. The US distributor does not recommend the UL cooler, and nudges people towards a standard aero classics 13 row cooler. So that is what I bought.
To get lots of oil cooling, it is recommended to put the cooler under the prop attached to the engine. UL makes brackets to this location, so I bought it from their US distributor (Wicks). For the price it wasnt worth building.
There is also an oil cooler adapter that mounts up front under the oil filter.
The bracket is quite large. Not sure if I will use this or make a new one. Proceeding with mock up anyway to learn what i dont know (yet).Used a pieced of 1.25 x 1.25 aluminum angle to bridge the gap and to tie in the shock mounts. Needed to shorten the port side 'leg' that attaches to the front of the engine.
With the bracket all the way 'up', and on the angle that the bracket specifies, the cooler is still touching the cowl, but much less than it was when I started.
Used a double exposure method that I have really wanted to try since I heard about it.
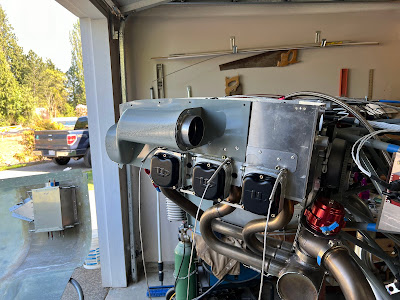
Cooler mounted to engine, no cowl
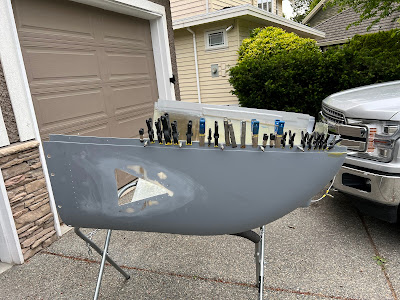
With cowl and 1" tape grid around roughly the correct area.
Overlaid the two pictures in MS Powerpoint, and made them both 60% transparent.
This should get me very close on initial cuts. Finessing will be required.
Tip(s):
- I bought the 'silent block' mounts as recommended by UL, as well as the M8 lock nuts. They really are lock nuts... so during mock up I went down to home depot and bought M8 non lock nuts. Much better for mockup.
After staring at this for several months, I am going to build a new engine bracket. The UL bracket is way to big and unnecessarily heavy for my cooler. I have a large chunk of aluminum angle that will do nicely.
Need to build the struts next. I have the UL struts, and am just planning on using them as is.
Because I built the new bracket out of thicker aluminum, I doubt I will be able to bend it to get the ~12 degree angle that the UL bracket has. I did flip the bracket on the cooler around to push it farther back. But it appears to have less room than it did before.
Need to cut out the cowl pretty soon and make the inlet.
Inlet cut. Its on a slight angle, but I am OK with that. I dont think it needs to be straight up and down.
I had been pondering the mounts for months (well, it seemed like months). I recently ordered all the fittings and figured it is time to go for it.
Fitting notes:
- All of the hose fittings on the cooler adapter are -10AN
- The fittings on the aero classics oil cooler are 3/8" NPT (not 1/2" NPT as I was told)
- 3/8" NPT to -10an is readily available in multiple configurations
My goal / hope is to keep the fittings at the top of the cooler. This will make the lines shorter and lighter. Flipping the cooler upside down meant trimming the bracket holds the assembly to the front of the engine. As a starting point, I decided to use the UL rear brackets. I am not sure if they are going to work, or even if I want them to work. They are simply about 1/8" think stainless with holes it in, and you bend it to your configuration. Gotta start somewhere.
Made a bracket at the bottom to capture the 3 holes on the bottom cooler bracket.
The fittings all look good for a first pass, except the pilot side fitting is going to change from an elbow to a straight fitting. Also probably changing the oil cooler adapter fitting from a 90 degree elbow, to a 180. Will try it and see if it fits.
Now that the cooler is fixed in place I need to do the fiberglass work for the inlet on the cowl. My original plan was to make the mold out of MDF. However, after rebuilding the inlets using foam I am starting to see the benefits. Super fast and easy to work, and you can just sand it away when you are done. So I think that is the method I am going to use. Where it is captured between two pieces of fiberglass, I may just leave it. Its definitely light. Also going to build it in place. Hopefully this is not a bad idea.
Quick test. Put a piece of packing tape on the cowl... and then stuck a piece of foam to the tape with hot glue. Seemed to hold well enough. So that is the plan. Tape up the sides, cut foam to fit and build the mold on the cowl installed on the airplane and see what happens. Going to tape up the oil cooler so nothing gets on it.
Well version 1 completely sucks. Need to start somewhere, but this needs significant work.
The below is a cowl off a Rans S19. I need to make it look something like this.
Built the foam up significantly (x3). Now its shaping / sculpting time. I dont think this is my forte...
So I took a stab at it. The foam is super easy to shape. But, I am realizing I didnt build it up enough forward. Going to extend it an inch. I need to fix the inboard section first, sand it flat, and then more foam.
It needs to flow into the rest of the cowl. I have a feeling I will be at this for quite a while. I want it to look 'organic' (can't think of a better term currently).
Built it up more and started shaping again...
This is starting to go in the right direction. Nowhere near done, but starting to not look like a minecraft character.
I spent a couple hours fine tuning the shape, and it doesnt look bad (for what it is). Unfortunately its big, and I need lots of air through it. I figure I am going to have to redo it completely, so I might as well learn everything there is to learn, so go ahead and glass it. If it doesn't work out, I have learned something.
I am planning on 2 layers of glass, but I have really bad luck trying to do multiple layers at once and I will do the 2nd layer after. I applied peel ply to much of it in small pieces. No way I can cover it in one piece with all the curves.
Packing tape was applied almost everywhere (not the bottom corners). So hopefully this will pop off easily. If not, I will have to remove the foam - but will see. It is not going to be perfect - lots of filling and sanding will be required - but gotta start somewhere and learn. This is completely new to me.
Success! After applying a 2nd layer of glass and letting it cure overnight, I started the process of removing it from the cowl - but first I drilled 6 holes for registration (2 on each side and 2 on the bottom). The packing tape worked... so after some gentle pulling in multiple directions it all popped off. Then I dug all the foam out using different size chisels. Because the foam was multiple layers, it broke apart fairly easily.
I rough trimmed off all the excess fabric.
Next is to trim down all the flanges and clean it up a bit, then I need to open up the hole in the cowl to the inside edge of the inlet. The plan will be to bond it on after trimming and sanding the cowl using cabo and resin, then a layer of glass from the inside of the cowl to the inside of the inlet. Then a layer on the flange, then fairing compound to make it all blend in.
I started cutting the cowl, and THOUGHT I left myself an easy quarter inch to spare so I could inch in on the inlet. Well, its pretty much right on for the sides, but the bottom needs to come back a fair bit more.
What it looks like on the plane...
Its not horrible, but I am not in love with it. It should be very functional, which is the most important.
I temporarily installed the oil cooler to fit the inlet. I figured now is the time to do this as the inlet is removable.
I trimmed a bit too much on the starboard side. Plus the bottom needs some fixing.
Its starting to look not too shabby. Its growing on me I think. Either that, or I dont want to start over!
I've opened up the hole in the cowl significantly to line up with the outer edge of the inlet. Its not all the way there yet... will do the final trimming once the inlet is bonded in place so I can glass the inlet from the back and the front.
I also added 2 layers of glass on the bottom forward lip and the inboard sides. I over trimmed in some areas, so had to build it back up. Still more to do, but its closer. Its easier to do all this now with the inlet removable so I don't have to constantly take the cowl on and off. The part is significantly stronger now, and I have extra material so I can clean up some off my gaffs.
Now its time to bond it on. The plan:
- Initial bond with resin / cabo. Smooth the edges as best as possible, let cure.
- Fill the edge between the inlet and cowl with resin / cabo again, and taper it
- 2 layers of glass on the inside and outside
- Putty wipe the outside
- Sand
First step was to sand off the gel coat / primer around the outside.
Fit the inlet, and sand down the inside to meet the inlet.
Resin / cabo, and clecod it in place.
So many months later... I have never been happy with the UL aft cooler mounts.
After talking with a buddy, he offered a solution of a triangular aluminum mount. So off I went...
Way more stable, and actually lighter.
The CAD model (Cardboard Aided Design) was perfect first time amazingly.
Cowl fits really well - thankfully.
The aft of the bracket is wobbly, and needs a bracket to tie the two of them together. That should be easy.
Now its all about finishing on these brackets, and reinstalling.
Done. All finished and installed... Just need to pressure test the oil lines, put on the fire sleeve.


